

Motor Damage Protection
Published by NXGEN CNC on Dec 23rd 2019
Click here for a PDF version of this post.
The DC Motor used for the Fadal Machine has been manufactured by Baldor and Glentek for over thirty years with approximately 40,000 DC brush motors produced. Even today we work directly with the manufacture to ensure you receive a quality motor that’s as good as or better than originally produced.
Our combined failure analysis experience has shown there are important issues to consider when installing a new DC motor. Failure to consider these can directly affect the life and warranty of the new motor.
Chances a mechanical problem could still exist that caused the original motor to fail. Simply replacing the motor without rectifying the problem could result in a premature motor failure. You must verify the mechanical operation of the slide and coolant protection after installation.
The two main issues besides age that cause (repeated) motor failures are HEAT and COOLANT contamination. The motor is warranted against failure due to defeats in material and workmanship. However, the warranty will be void for motor damage caused by coolant contamination or an overheated motor with burnt windings or loose magnets.
HERE ARE TWO IMPORTANT ISSUES WHICH HELP EXTEND THE LIFE OF YOUR MOTOR
1) HEAT - ALL MOTORS
Any motor has a continuous rating and an intermittent duty cycle. The typical sign of excessive use is when the motor gets hot; warm is ok but not so hot where you cannot hold your hand on the motor. Another sign is when the paint comes off the motor.
There’s two basic designs of axis motors; the brushless motor has the motor coils on the outside of the rotor, it’s called the “stator” because it doesn’t rotate.
With the brush motor, the magnets are on the outside of the rotor and the winding are wound around the rotor. Because the windings are on the inside, it is very difficult for the coil heat to escape and also detect the heat before it’s to late.
In most cases with the brush motor, the insulation damage is done by the time the extreme heat is detected. The winding insulation of the coils can melt which results in a coil electrical short.
The motor will have a distinct “burnt” smell when you remove the rear cap. Also the motor magnets can become loose (clunking sound) because the heat will break down the magnet glue that bonds the magnets to the motor casing,
NOTE: Once the rotor coils or magnet glue is damaged, neither manufacture will warranty the failure.
Mechanical Binding
Rotate the ballscrew by hand to verify the system is free from mechanical bind; at the center and both extremes of the travel. A tight or damaged gib could cause a bind in the slide and create excessive motor current to position the axis which then results in heat.
Backlash Setting
Verify the backlash setting has a minimum value of .0002 counts (see BL command).
The CNC uses this to reduce the in-position holding current going to the motor by reversing 1/2 the backlash setting at the completion of the move, when going into standby.
You can easily measure the motor current with a simple DC AMP probe. You should see the motor amps drop from approximate 6 amps to less than 2 amps while just setting still, without motion. This indicates free servo motion without a mechanical bind.
A simple rule is Current = Heat.
Amplifier Current Setting
Most amplifiers have a current limiting potentiometer that allows the maximum current output to be reduced. Some amplifiers have more continuous current output than the motors rating.
To reduce the amplifier current output is a simple adjustment.
- A)Write a simple program that moves the axis back and forth in rapidtraverse.
- B)Rotate the current limit pot (CL) until the CNC faults with a MOTOR OVERLOADalarm.
- C)Rotate the CL pot back approximately 10% or more, until the CNC doesn’tfault.
2) CONTAMINATION - X Axis and Rotary
Because of it’s location in the workspace, the rotary and the X axis motors are the most susceptible to coolant contamination. The Fadal DC motors either from Baldor or Glentek have never been completely sealed (IP65) and require careful installation to avoid coolant contamination.
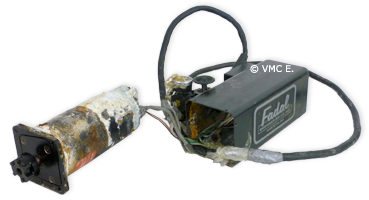
The original design was using a two-tiered system with the Box or Cover being the primary shield and the secondary seal being at the motor entry point for the wires.
While the brush caps, front motor shaft and end caps are sealed using o-rings, the most vulnerable point is at the wire entry point of the motor.
NOTE: The motor manufactures will not warranty a motor returned because of coolant contamination.
Rotary Head Motor Protection:
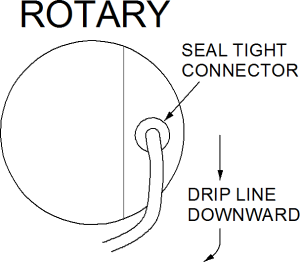
The MTR-0003 and MTR-0125 have a seal tight clamp to aid in restricting coolant entry. It is important that the wires coming out of the motor drop down to create a drip line that carries any moisture away from the motor and not towards it.
Motor Cover Box -
- Verify that the motor cover box is correctly sealed at the cover mounting plate; most units have a o-ring that needs to be replaced if defective.
- Verify the box has at least two weep holes in the bottom to allow any moisture that gets into the box to escape. Without a weep hole, we have seen rotary heads in for service partly filled with coolant as in the above picture.
- Check for any possible entry points for coolant leakage into the motor box. Anything you can do to shield the box/motor will help extend the life of the motor.
Also, remind the operator(s) that keeping the coolant on the part and off the rotary head will help tremendously.
In severe applications or with multiple failures, they need to consider any tooling changes or additional shielding to reduce the coolant exposure.
X Axis Motor Protection:
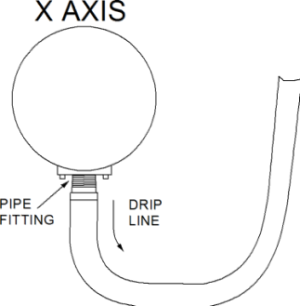
The X-axis motor has two critical aspects that need careful attention during installation.
- The design of the gray wire conduit requires a proper drip line that carries away the coolant from the motor and not into to the motor. The entry point to the motor needs to be from the bottom, as shown in the picture.
- The pipe fitting needs Plumbers Tape applied to seal the connection. Inspect the conduit pipe fitting and conduit connection, replace the conduit if necessary.
To attach the X axis conduit to the motor -
First remove the motors square adapter via the four cap screws then attached it to the pipe fitting of the conduit using Plumbers Tape. Then reattach the square adapter plate to the motor using the four cap screws.
- Remind the operator(s) that keeping the coolant on the part and off the X-axis motor will help tremendously. Allowing the chips to build up to the level of the motor is almost equivalent to submersing the motor.
In severe applications or with multiple failures they need to consider any tooling changes or additional shielding to reduce coolant exposure.
NOTE: An X-Axis motor cover was added for all newer machines for coolant protection. If your machine doesn’t have a motor cover we recommend adding one. We do sell retrofit protection kits for older machines.